Setup SEO Friendly Angular Apps with Prerender.io
18 Oct 2015 . . Comments
Making SEO work in AJAX applications is not necessarily that hard. In fact, Google, Yahoo, and Bing will recognize your ajax application and request an html version of the JavaScript generated pages. In this tutorial, I'll explain how the search engine handles AJAX pages and what we need to do to setup SEO friendly AJAX pages.
See Tutorial if you understand how SEO works with AJAX applications. Or if you just want to see the code, check out my repo here.
What Search Engines do:
<meta name="fragment" content="!"> present in the head of the page. ( I highly recommend pushstate. I'll show you how to set that up in this tutorial)
What We Need to Do:
<meta name="fragment" content="!">
Setup For Angular
We need to setup HTML pushState. I don't recommend using the hashbang (!#). It's 2015, use the hashbang onlu if your Angular app is part of a greater HTML site. Essentially, we need to convert www.example.com/#/ to www.example.com/ through the HTML History API.
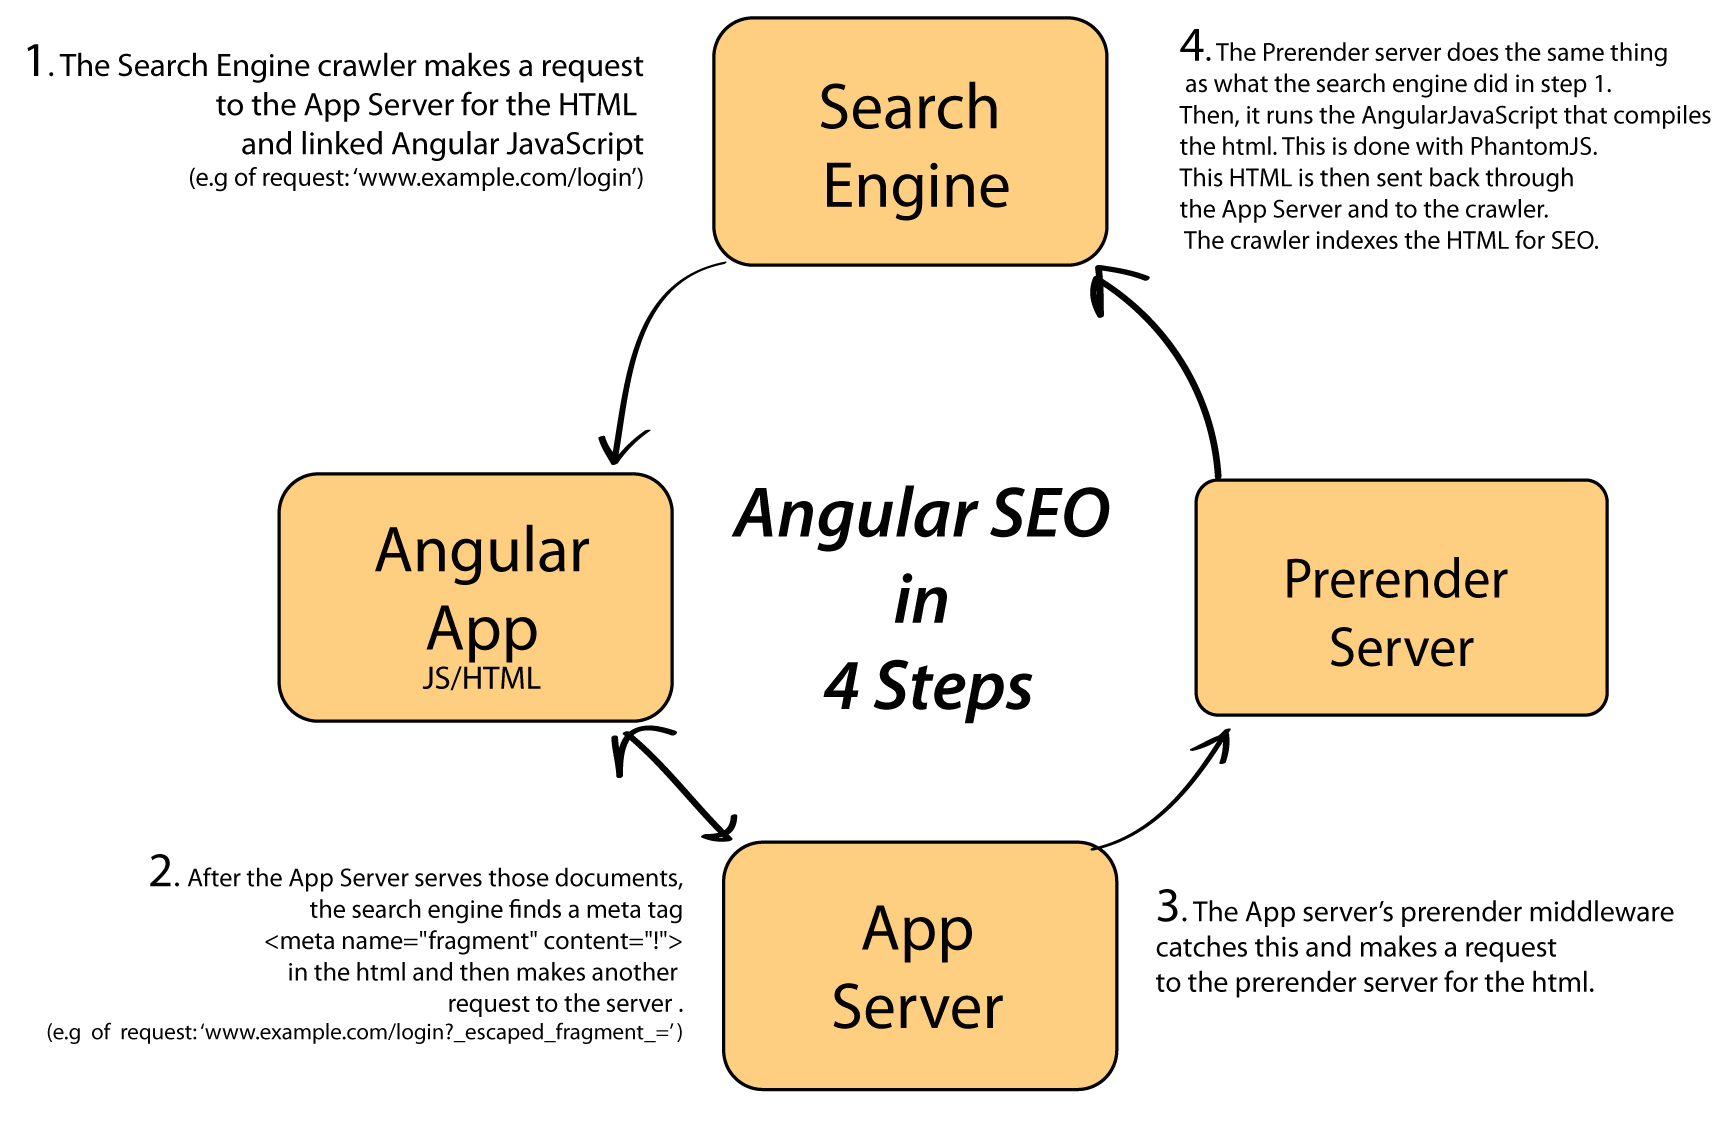
How This All Works
I made a diagram of the flow of how it works with AJAX/Angular applications. You can also cache the pages with Amazon S3 storage in order to save time/money of the server loading time. Prerender has plugins and guidelines as how to set this up.(Click to Enlarge)
Tutorial:
For this tutorial, I'm using 2 Node.js servers. One for the App and another for rendering the HTML.
What You'll Need:
Getting Started
Backend - Express Application
Find an empty directory. If prompted for other things, just press enter (for bower's type use node). In your terminal, enter the following: npm install express prerender-node --save
bower init
npm init
touch server.js var express = require('express');
var app = express();
app.use('/js', express.static(__dirname + '/js'));
app.use('/bower_components', express.static(__dirname + '/bower_components'));
app.use('/css', express.static(__dirname + '/css'));
app.use('/partials', express.static(__dirname + '/partials'));
app.all('/*', function(req, res, next) {
// Just send the index.html for other files to support HTML5Mode
res.sendFile('index.html', { root: __dirname });
});
app.get('/', function (req, res) {
res.sendFile('./index.html');
});
app.listen(3006, function () {
"listening on port 3006"
});As you may have noticed, we are serving static files from the js, css, bower_components, partials folder. In your terminal, make all these directories with mkdir (e.g 'mkdir js'). This file structure is for serving assets for ui-router. For serving assets for other types of servers, see ui-router's guidelines Lastly, for the backend, setup the prerender middleware. Add the following after the last app.use
app.use(require('prerender-node'));
That's the server setup. Time to make the frontend.
Angular Frontend
In your terminal, bower install angular angular-ui-router --save
touch index.html /js/app.js partials/_test.html
In your index.html, paste the following:
      <!DOCTYPE html>
  <html lang="en" ng-app="testApp">
  <head>
    <meta charset="UTF-8">
    <title>Angular SEO app</title>
    <meta name="fragment" content="!">
    <base href="/">
  </head>
  <body>
    <header>
    <p> Test App</p>
    </header>

    <div ui-view>

    </div>
     <script type="text/javascript" src="./bower_components/angular/angular.min.js"></script>
      <script type="text/javascript" src="./bower_components/angular-ui-router/release/angular-ui-router.min.js"></script>
      <script src="./js/app.js"></script>
      <script src="./js/controllers/TestCtrl.js"></script>
  </body>
  </html>
We inserted that fragment metatag in the head. We also set a base to set where the partials will be rendered. We have an ng-app of testApp and a div with ui-view for ui-router. We also included all the files we created earlier.
Now, we're going to do some JavaScript.
In your app.js paste the following:
    angular.module('testApp', ['ui.router'])
    .config(Router);

    function Router ($locationProvider,$stateProvider, $urlRouterProvider) {
        $locationProvider.html5Mode(true);
        // hashbang fall back for older browsers
         $locationProvider.hashPrefix = '!';
      $stateProvider.state('home', {
      url: '/',
      templateUrl: 'partials/_test.html'
    });
      $urlRouterProvider.otherwise('/');
    }
We injected ui.router in order to set the different pages. We added the route. Then, we include the $locationProvider. The $locationProvider is what ultimately converts are hash links into regular looking urls. I personally hate the angular /#/ and love this simple Angular pushState trick. Next we're going to create our test controller. In terminal,
mkdir /js/controllers
touch /js/controllers/TestCtrl.js
In your TestCtrl.js, add:
    angular.module('testApp')
  .controller('TestCtrl', function () {
    var self = this;
    self.example = "If this shows with escape_fragment, then it works!";
  });
To test to see if your Angular works, in your terminal run:
node server.js
Setting up the Prerender Server
To setup our prerender server, we're going to download this github repo with git. Cd out of the current directory and go to a different folder in your terminal and type:git clone [email protected]:prerender/prerender.gitcd prerendernpm install
Now that you have the server installed, we need to make one last change. We need to add an environment variable that will tell your App server and its middleware what address your prerender server is on. In your bashprofile or zshrc, add the following:
export PRERENDER_SERVICE_URL='http://localhost:3000/'
If you don't know where it is check here -> (bash / zshrc)
Then in your terminal, for zshrc: source ~/.zshrc
for bash:
source ~/.bash_profile
Running and Testing
You're almost done! Setup two tabs up in your terminal, each with the two different servers we setup. For each of them, run:
node server.js
If the text shows, it should be working! Double check by right clicking and viewing the page source. If this shows:
<div ng-controller="TestCtrl as test" class="ng-scope ng-binding">
If this shows with escape_fragment, then it works!
</div>
Congrats! Google would be proud. You setup two servers locally, made an Angular app, and are generating SEO friendly HTML. If you noticed anything wrong with this tutorial or need any help, just leave a comment below. If you are still struggling with this, download my repo here.
Best,
Evan </div>